Showing posts with label military. Show all posts

Family Friday: May 30

Johnnie's parents have flown back to Seattle after a two week visit.  CC had a great time interacting and bonding with them.  Wherever we live, we tend to only see our families once or twice a year so we treasure that time together as much as we can.  Despite the distance, I wouldn't trade our life for anything.  I love that CC is experiencing different cultures, people, food, music, climates, etc, in the most formative years of her life.  I really believe that it will help shape her into a well-rounded, open-minded, and understanding person.  It has certainly changed me.

I was going to include photos from all of last week but decided to stick with our recent weekend getaway.  Johnnie and I took advantage of having live-in babysitters by sneaking away for two nights over Memorial Day weekend.  We love CC to pieces but we haven't had any alone time (other than a few dates) for about a year.  Short trips and date nights are things we have to do more often - it's good for our minds and our relationship.

I once read the advice somewhere of how it is especially important to nurture your marriage after having children, to always keep it a top priority.  Kids grow up, move away, and live their own lives.  If you don't keep your marriage strong while your kids are there, what will you have left after they leave?


We spent the weekend at Bellows Air Force Station, between Kailua and Waimanalo on the east side of the island.  Bellows AFS has the same baby powder sand and turquoise water that you see in Kailua.  There is a section of Bellows Beach that is open to the public on weekends.  The rest of the beach, the lodging, and amenities are only accessible to military ID holders and their guests.

On Bellows AFS, there is a Subway restaurant, and 24/7 convenience store, a snack bar, and a pub for all of your food and drink needs.  There is also a gas station, a launderette, and recreational equipment rentals.

For recreation, there is a miniature golf course, basketball and tennis courts, disc golf, sand volleyball, golf driving range, paintball, and the gorgeous beach complete with bath houses.

There are tent and RV campsites, rustic camper cabins (with no electricity or water), furnished cabins (with a kitchen and all basic amenities), and condo units (like a hotel which includes air conditioning).

We rented a furnished cabin for our two-night stay.  It was a little like upscale camping.  The cabin was clean and the bed was fine but the rest of the furniture (there wasn't much) was uncomfortable.  There was no air conditioning but there were ceiling fans.  Towels, linens, and kitchen supplies are all included but so were many insect roommates.  There was no luxury but it was certainly good enough for lounging around and enjoying the weekend together.


We had an oceanfront cabin near stairs that led down to the water.  There was a small sandy beach below the stairs during low tide that disappeared during high tide.  The large recreational sandy beach was only a short walk away.


We live on the north side of the island where we can't see the sun rise over the ocean.  So despite being on vacation, we woke up very early both mornings to watch and photograph the sunrise.

Johnnie had fun making time-lapse videos each morning with our GoPro camera while I took photos with my big camera on a tripod.  We both took some photos with our iPhones as well and ended up with two different views of each of my favorite photos:

Early Morning at Bellows Beach:

17mm, f/22, ISO 100, 0.8s

Sunrise at Bellows Beach:

19mm, f/22, ISO 100, 0.5s

Sunrise over the Mokulua Islands (the Mokes):

20mm, f/22, ISO 50, 5.0s

We had absolutely nothing to do all weekend and it was glorious!  Johnnie went kayaking, I sat watching the ocean and doodled in a sketch pad, we ate and drank, we went for a walk, we played in the water, and mostly we just relaxed (physically and mentally).  It was a fantastic getaway!


After checking out of our cabin on Monday, which was Memorial Day, we stopped by the National Memorial Cemetery of the Pacific in the Punchbowl Crater on our way home.  It is always an incredible place to visit but was extra touching to see on Memorial Day with a flag and a lei placed at every grave.  The cemetery is the resting-place for almost 53,000 veterans (and eligible family members).  Veterans from all over the country, from all the different wars, some known and some unknown - we are thankful for their service and sacrifice.


*******
"A vacation is having nothing to do and all day to do it in."
~Robert Orben

Johnnie and Dulce Reunited

If you follow our blog, then you most likely saw the photo post of Johnnie's Deployment Homecoming in April when Cameron and I met him at the airport.  Dulce had to wait at home to see her daddy again but that allowed me to get it on video!  I really thought that Dulce would whine or cry when she saw Johnnie but she was completely silent the entire time so I added music.
I originally edited the video with the perfect song but ran into copyright issues on YouTube... rightly so I guess.  After doing some research, I found that YouTube has royalty-free music that is free for anyone to use.  I uploaded the video and added a royalty-free song from YouTube... problem solved :)

Here is Dulce seeing Johnnie again after six months apart:


*******
A dog can express more with his tail in seconds than
his owner can express with his tongue in hours.
~Author Unknown

Family Friday: June 14

40 Weeks old


Cameron has been using her Sit-to-Stand Learning Walker for just over a week now.  She uses it on her own a lot every day.  She is getting very good at pulling herself up on it and walking around with it.

This week she started to balance on her own while standing!  She will suddenly let go of whatever she is holding onto and put her hands in the air.  She is very proud of herself for learning this new skill.  All she has to do now is take some steps while balancing.  She is going to be walking very soon!


Cameron also finally decided to hold her own bottle this week.  It's not that she couldn't before, it's that she didn't want to.  She was too busy touching everything around her while she drank.  She will feed herself a couple of her bottles each day but she still prefers us to hold some for her.


Some of Cameron's favorite toys aren't even toys at all.  It is the little things like this that I want to remember years from now so I have to document it.  Here are Cameron's favorite "non-toys":

  1. Mini frying pan - this is a real pan.  She loves putting her mouth on the metal and scraping her fingers on the ridges on the bottom.
  2. Small metal bowl - it's shiny and round... fascinating :)
  3. Plastic scoop from baby formula - it has a tiny hole in it so she blows into it and sucks on it.
  4. Bamboo cooking utensils - she likes gumming the end of the handles.
  5. Plastic Easter eggs - left over from Easter.  She loves sucking on them, whole or in pieces.
  6. Round plastic cookie cutter - she likes scraping it against her tongue.
  7. Gatorade shaker - bottle washed, dried, dry rice added, and the cap superglued back on.


We used to always sit on the back porch for a while every day but Cameron wants to crawl and she goes straight for the grass and dirt every time.  Our back yard grass is very rough and the soil is actually contaminated (yikes, right?!) so I don't want her crawling around in the yard.  This week we switched our outside time to the driveway in the front of the house.  There is some shade all day, a lot more space for Cameron to explore, and no exposed soil.


Cameron does not like the feeling of cement under her knees so when she crawls off of the blanket, she crawls on her hands and feet.  It's a good sensory experience for her :)


This week Cameron and I went to a Change of Command ceremony for Johnnie's squadron.  This is a ceremony where the outgoing commander officially hands over command of the squadron to the incoming commander.  Ceremonies like this are always neat to watch, although the speeches can get a little long.  Cameron added her thoughts (loudly) a few times :)


Johnnie was the lone guy standing in front of a large group formation.  He was the one in charge shouting orders for the group to follow.  I never knew he could project his voice like that!  I rarely get to see him working... I'm always impressed with his skills when I do :)


We checked out some of the heavy equipment after the ceremony.  Cameron wasn't very impressed.


And in case you were wondering... still no teeth :)


*******
"Each day of our lives we make deposits in the memory banks of our children."
~Charles R. Swindoll

Deployment Homecoming Dress

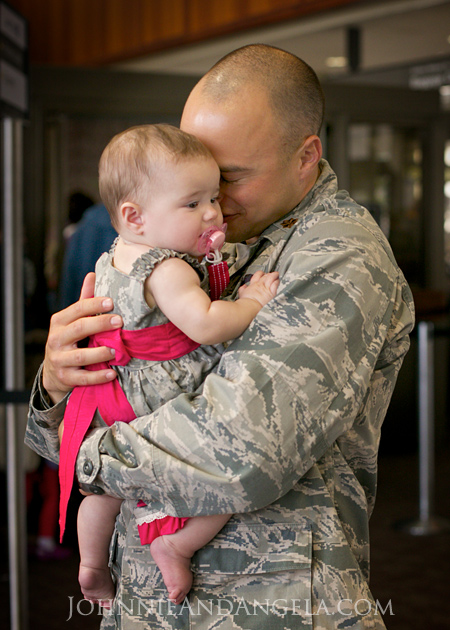
When I saw military camouflage fabric in Fabric Mart, I knew that I had to make a dress for Cameron for her daddy's deployment homecoming!  This pattern matches the Army Combat Uniform (ACU), not an exact match to the official Airman Battle Uniform (ABU) that Johnnie wears but it's very close.  No military uniforms were harmed in the making of this dress :)


This was a no-pattern, figure-it-out-as-I-go project so I'm amazed that it came out as well as it did!  I traced the bodice from a dress we already had and used rectangles of fabric for the rest.  It was fairly simple and took two days of Cameron's naps and some playtime to finish.


To make the top, I traced the bodice of a dress that I knew fit her well, adding a 1/2 inch along the top and adding a few extra inches along the sides and bottom.  I cut out 4 identical pieces.  I put the right sides of two pieces together, stitched along the top, and then flipped it right side out to make the panels for the front and back.  I didn't want to bother with a zipper or buttons so when I stitched the sides together, I made it just big enough to pull up over her body to put on.

The bottom of the dress is a simple rectangle of fabric, twice as long as the circumference of the completed bodice.  I ruffled one side and sewed it to the bodice, and then I attached a ruffle and lace to the hem.  The lace was an afterthought - something I had in my sewing stash and decided to add.


If you sew at all, you probably know the whole "use a long stitch and then pull the thread to make a ruffle" thing.  I always found that method to be a pain so I avoided ruffles... until I learned a new trick.  Setting your sewing machine to the highest thread tension and the longest stitch creates an automatic ruffle as you sew... no thread pulling required!  Try it - you'll be amazed :)


When making decorative ruffles like on this dress, I cut a loooong rectangle of fabric (at least 2 times as long as what the ruffle will attach to) and then I press it in half and stitch along the open side.  This eliminates the need for a hem along the bottom of the ruffle.

I made this dress so that it could be pulled up over Cameron's body without needing zippers or buttons. Therefore, I needed straps that either stretched or tied so that I could get her arms through!  I opted to make them elastic.  I took a rectangle of fabric and sewed it into a tube.  The tube ended up being much wider than the elastic (wasn't using a pattern, oops!) so I stitched two parallel lines the width of the elastic for a better fit.  It ended up creating a cute ruffle effect!  I love when mistakes turn into something unexpectedly good :)


I sewed a sash out of the same fabric I used for the bottom ruffle.  The sash is simply a very long rectangle, sewn into a tube, and pressed flat.  I attached it to the dress on the sides and on the bottom center to keep it in place.


The fabric flower was also an afterthought.  I had some extra lace (that was used around the hem) and I knew I had some fabric flower tutorials pinned on Pinterest.  The flower is simply made of circles of fabric folded and hot glued together with a button (left over from a nursery project I'll blog about soon) hot glued on to cover the center.  Check out this great tutorial on OneProjectCloser on how to make a variety of fabric flowers.  All of the fabric and hot glue made it a thick little flower so instead of trying to sew it onto the dress, I attached it with a safety pin.


I had enough fabric left over from the dress to make some bloomers to cover Cameron's diaper.  This was actually a little more complex than the dress so I did use a pattern for this (most baby girl outfit patterns seem to come with this).  Following the directions, it wasn't too difficult and they came out well.


A few extras for the day: I made Cameron a matching pacifier clip (click for tutorial) and I used safety pins in the back of one of Johnnie's hats to make it small enough to fit her head.


I also painted the "welcome home" sign you saw in the photos of the homecoming.  I squirted shades of yellow acrylic paint on an art board, blended it with a large brush, and let it dry.  Then I printed out the letters in the size I wanted on normal printer paper and then traced them on to the yellow board using transfer tracing paper.  After that, it's just a matter of painting within the lines.


*******
"Memories are stitched with love."
~Author Unknown

Shared on Inklings & Yarns: Inky Linky 15 - visit that page to see more great DIY projects!

Deployment Homecoming


*******
"I'm lucky I'm in love with my best friend
Lucky to have been where I have been
Lucky to be coming home again"
~Lucky by Jason Mraz