
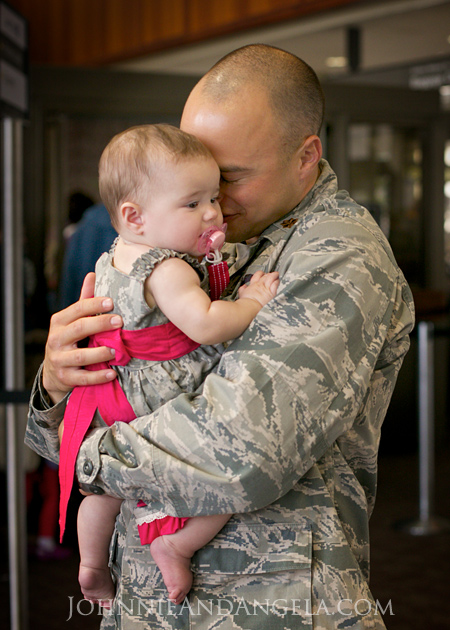
This was a no-pattern, figure-it-out-as-I-go project so I'm amazed that it came out as well as it did! I traced the bodice from a dress we already had and used rectangles of fabric for the rest. It was fairly simple and took two days of Cameron's naps and some playtime to finish.

To make the top, I traced the bodice of a dress that I knew fit her well, adding a 1/2 inch along the top and adding a few extra inches along the sides and bottom. I cut out 4 identical pieces. I put the right sides of two pieces together, stitched along the top, and then flipped it right side out to make the panels for the front and back. I didn't want to bother with a zipper or buttons so when I stitched the sides together, I made it just big enough to pull up over her body to put on.
The bottom of the dress is a simple rectangle of fabric, twice as long as the circumference of the completed bodice. I ruffled one side and sewed it to the bodice, and then I attached a ruffle and lace to the hem. The lace was an afterthought - something I had in my sewing stash and decided to add.

If you sew at all, you probably know the whole "use a long stitch and then pull the thread to make a ruffle" thing. I always found that method to be a pain so I avoided ruffles... until I learned a new trick. Setting your sewing machine to the highest thread tension and the longest stitch creates an automatic ruffle as you sew... no thread pulling required! Try it - you'll be amazed :)

When making decorative ruffles like on this dress, I cut a loooong rectangle of fabric (at least 2 times as long as what the ruffle will attach to) and then I press it in half and stitch along the open side. This eliminates the need for a hem along the bottom of the ruffle.
I made this dress so that it could be pulled up over Cameron's body without needing zippers or buttons. Therefore, I needed straps that either stretched or tied so that I could get her arms through! I opted to make them elastic. I took a rectangle of fabric and sewed it into a tube. The tube ended up being much wider than the elastic (wasn't using a pattern, oops!) so I stitched two parallel lines the width of the elastic for a better fit. It ended up creating a cute ruffle effect! I love when mistakes turn into something unexpectedly good :)

I sewed a sash out of the same fabric I used for the bottom ruffle. The sash is simply a very long rectangle, sewn into a tube, and pressed flat. I attached it to the dress on the sides and on the bottom center to keep it in place.

The fabric flower was also an afterthought. I had some extra lace (that was used around the hem) and I knew I had some fabric flower tutorials pinned on Pinterest. The flower is simply made of circles of fabric folded and hot glued together with a button (left over from a nursery project I'll blog about soon) hot glued on to cover the center. Check out this great tutorial on OneProjectCloser on how to make a variety of fabric flowers. All of the fabric and hot glue made it a thick little flower so instead of trying to sew it onto the dress, I attached it with a safety pin.

I had enough fabric left over from the dress to make some bloomers to cover Cameron's diaper. This was actually a little more complex than the dress so I did use a pattern for this (most baby girl outfit patterns seem to come with this). Following the directions, it wasn't too difficult and they came out well.

A few extras for the day: I made Cameron a matching pacifier clip (click for tutorial) and I used safety pins in the back of one of Johnnie's hats to make it small enough to fit her head.

I also painted the "welcome home" sign you saw in the photos of the homecoming. I squirted shades of yellow acrylic paint on an art board, blended it with a large brush, and let it dry. Then I printed out the letters in the size I wanted on normal printer paper and then traced them on to the yellow board using transfer tracing paper. After that, it's just a matter of painting within the lines.

*******
"Memories are stitched with love."
~Author Unknown
Shared on Inklings & Yarns: Inky Linky 15 - visit that page to see more great DIY projects!
Stopping by from Inklings & Yarns Inky Linky. I absolutely love everything about this dress!
ReplyDeleteThank you! And thanks for stopping by :)
DeleteHi, I saw this on Inklings & Yarns and just had to check out your full post. I am definitely teary LOL! I have to tell you, I shared this on my Facebook page because I know a lot of crafters and/or military folks. Best to you & yours, CG
ReplyDeleteThank you! And thank you for stopping by and for sharing a link to our blog :)
DeleteNice blog, thanks for sharing the information. I will come to look for update. Keep up the good work
ReplyDeleteAmazing, so stylish dress! Your girl is lovely, You must be a great dad and a good husband.
ReplyDeleteYou did an amazing job!!
ReplyDeleteThanks for sharing !
She's a little cutie!
This is so cute! I was really hoping that your page would have brought me a link where I could buy this dress for my baby girl :(
ReplyDeletebeautiful family. bless you and your husband for his service.hope I will not ever have to go through another deployment with my son and granddaughters but if I do they will all have dresses like yours.
ReplyDeleteThis is a very beautiful and so much Gorgeous homecoming dresses I seen ever. Thanks to Owner of this Site to share it. Very Nice Post. I hope I see another beautiful post next time. Thank you.
ReplyDeletehomecoming dresses
This post just touches my heart! Your images (and your handiwork) inspire. I'm thinking about doing some American Girl doll dresses for my sewing blog (I do doll clothes), and this little dress has me thinking hard about how to combine lace with ruffles. Thanks!
ReplyDeleteGirl,I have literally been sewing for 45 years and have never seen that ruffle technique, Thank you so much!! Oh yea,that little dress is awesome,you did a great job! Just show we are never to old to learn something new. =D
ReplyDeleteI had to go to my machine and try that ruffle trick, OMG I just finished a raven queen dress and cape for my niece and it has a lot of ruffles. Really wish I had read this first but thanks for all my future ones. Your dress is almost as beautiful as your daughter. What a wonderful homecoming for your husband.
ReplyDelete